#1 resource for Cigar Box Guitars, Free Plans, How-To, Parts & More!
Newbie questions
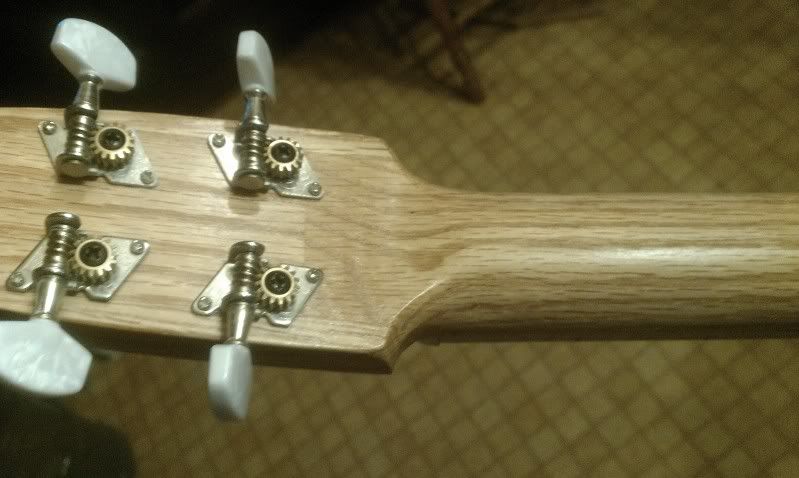
I have been bitten by this CBG bug and have 5 red oak necks glued up with 13 degree scarf joints. Three of the necks are 1 3/4" wide and two are 1 1/2" wide. The wider ones I ripped from larger boards and figured I would use the wider boards for 4 string guitars but 1 3/4" is really huge for 4 strings.
Wondering what is your width at the nut for a 4 string, are you still using 1 1/2" stock? What type of neck reinforcement are you using for 4 string necks if any?
Replies to This Discussion
-
Permalink Reply by Mungo Park on
-
On your next set of necks try putting a thin strip down the middle of the neck, rip the neck length wise and glue it back up with a 1/4' strip in the middle. This will add some extra a strength. Some will reverse the outside pieces to ad to stability.
Cheers Ron.
-
Permalink Reply by Charlotte Henry on
-
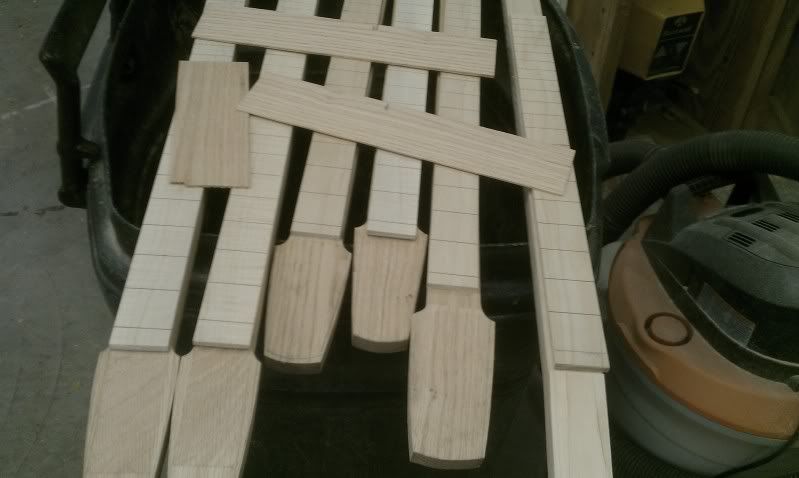 I've got the basic peghead shape I want and have only 2 that needed overlays. Just one neck is getting a no frills peghead (far right). I slotted all the fretboards by hand and after six consecutive fretboards I think I would really like to use the table saw for slotting at some point in the future. Next is cutting position markers and inlaying them and then fretting. This is more work than it looks like.
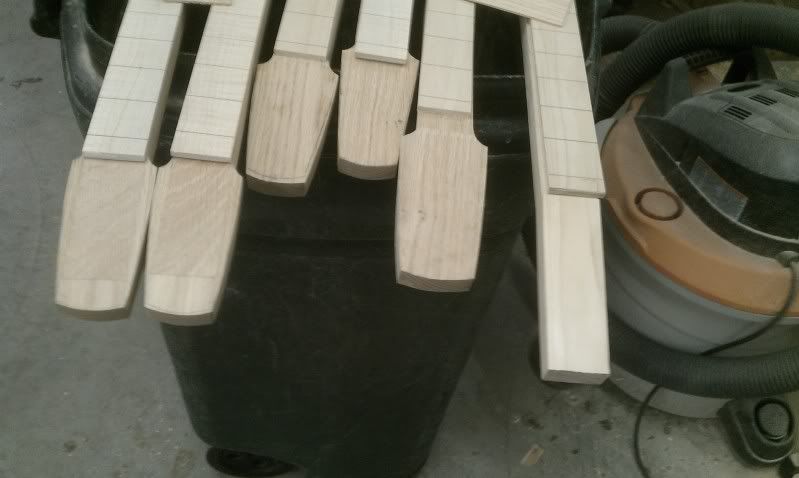
-
Permalink Reply by Clock The Wolf on
-
"This is more work than it looks like." ( ?!?!?!?! )
Looks like plenty o' work to me !
Just keep repeating : this is fun , this is good for me , I'm enjoying this , this was a good idea ...
Avoid gibbering quietly to yourself at odd hours instead of sleeping , remember that the human body needs food and water to survive, and refrain from tearing apart restaurant chairs to get at "perfectly good neck wood going to waste."
Have fun!
-
Permalink Reply by Ron "Oily" Sprague on
-
Charlotte,
To echo Clockwork somewhat, but in a different way:
Maybe it looks like a lot of work because you're doing 5 necks at once, as a newbie. Just take one of those all the way to completion. Learn from that one, and apply what you learned to the next one. Play the result for awhile, in between doing stuff on the other 4. Pace yourself (unless you're trying to get all 5 done before Christmas as gifts). I watch my wife go through the same stress pattern every year as a veteran quilter, who is trying to get 5 or 6 major quilts with different designs done just before we go home for Christmas (she finished the last one last night).
I suffer from the same burst of mental creativity when thinking about CBG designs (hey! let's try mag pups on that one, internal bracing on this one, 3 strings for Aunty Sue, 4 strings with walnut fretboard for Uncle Joe, etc.), then realize that each one requires the same level of work commitment, but sometimes in different aspects of the design, and all of them have been started at the same time. Which makes the whole mess look somewhat overwhelming. Finish one. Then do the next one. Tweak each one, because each one will be different. You won't be able to control yourself ;-).
I completely understand the allure of using kewl tools to speed up the process, and making an assembly line out of it. Just tell yourself, "Today, I'm building a go-kart. Tomorrow, a Volkswagen Beetle. Next week, I'm gonna try to build a Ferrari. But, for today, I'm gonna build a go-kart. And I'm OK with that."
Maybe blog each build as you go?
Good luck!
Oily
-
-
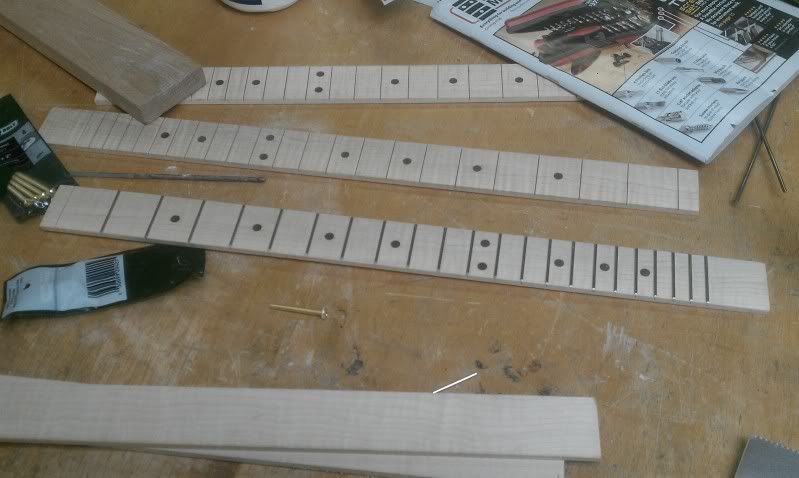
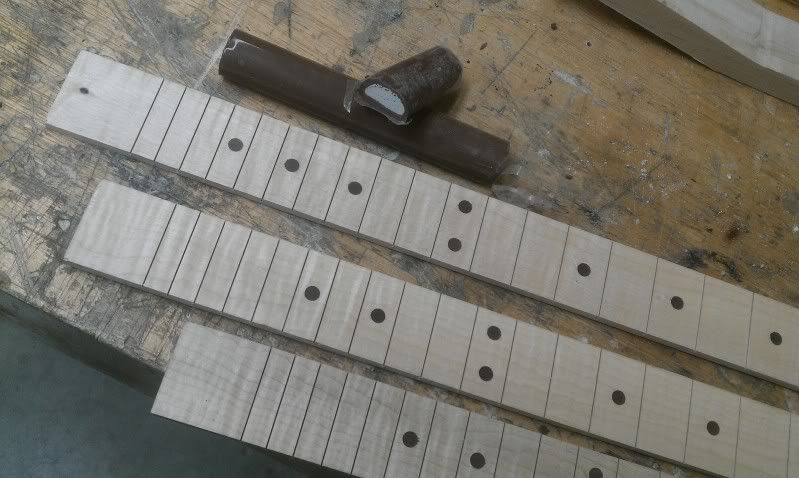
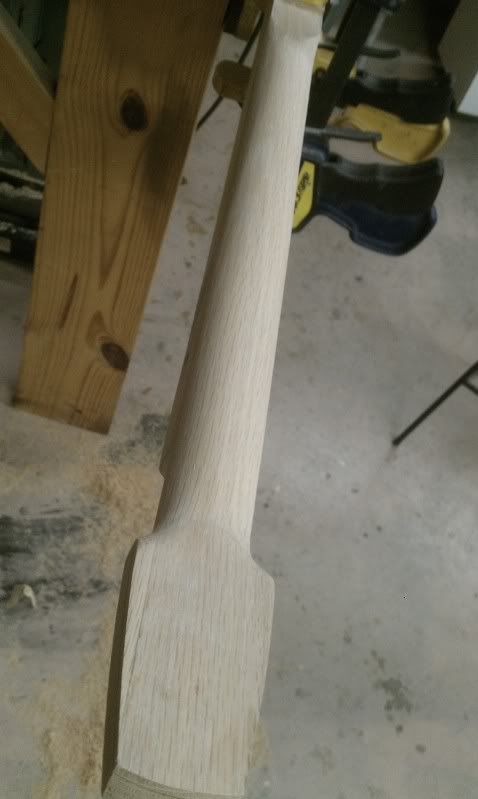
Well, I decided that 6 is just too many to do at one time and be able to enjoy the process, so I pulled back to work on just 3 for right now, however I slotted one more fretboard and did position dots on it and 3 others. I just wanted to have one more fretboard waiting on me when I get through with the first three. I thought you guys might be interested in my position markers. I used a 1/4 inch forstner bit to drill the flat bottom holes in the fretboards and then filled the holes with mahogany colored epoxy putty. You can see what the putty looks like, sort of like a tootsie roll. I used a single edge razor blade as a spatula when leveling it, but leaving it somewhat proud in the hole. It helps to wet the razor blade with denatured alcohol when using it as a spatula on the epoxy putty and it cleans the razor blade very well too. After the epoxy hardens I cleaned up with a sanding block with 150 and then 220 grit paper. The first picture shows one I had just finished fretting. I had carried fretwire with me to the shop today and did this one board and stopped because I want to run the fret wire through my fret bender before I fret the other boards. I feel the ends stay down better if the wire has been bent.
I found the curly maple at home depot and this was an 11 foot long 1X2 with curl for the entire 11 feet. Stroke of luck and I thought it would make some really pretty fretboards.
-
Permalink Reply by MichaelS Country Boy Guitars on
-
Nice work and keep the photo journal coming but stay away from that Stew Mac catalog, a person could go broke with one of those.
-
-
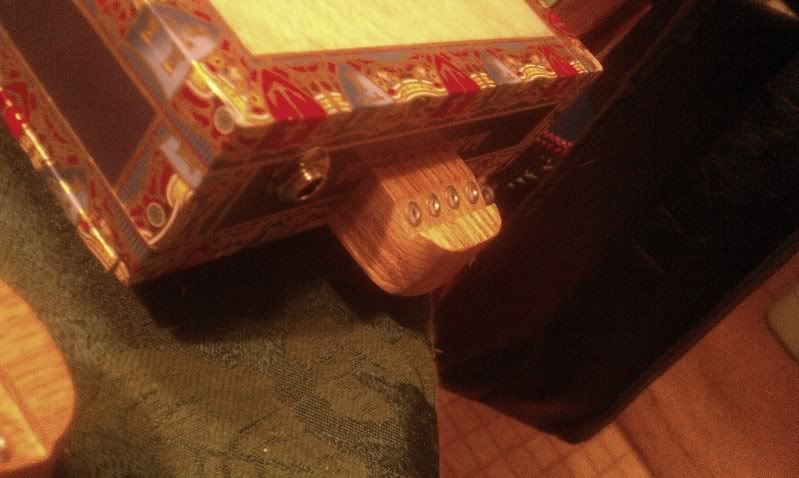
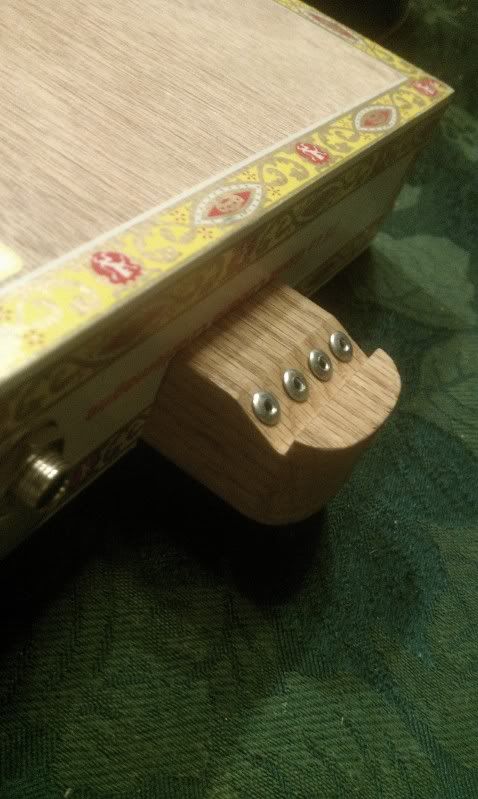
Worked all day and from 6:15 til 11:00 I worked on these cbg's. What I got done tonight was #1. drilled the stepped holes for the tuners in 5 necks. #2. used table router to recess the area under the lid that I don't want touching on the 3 that I'm trying to finish first. I positioned the necks in the boxes and marked every important position. #3. Glued reinforcement under the routed area to maintain consistent strength. #4 shaped the back of the necks and sanded to 100 grit.

-
Permalink Reply by Mike Breen on
-
Charlotte:
When you are using 1x2 and you do your scarf joint what is your method of getting the head down to the right size for the tuners to reach through. great work you are very talented.
Thanks
Mike
-
-
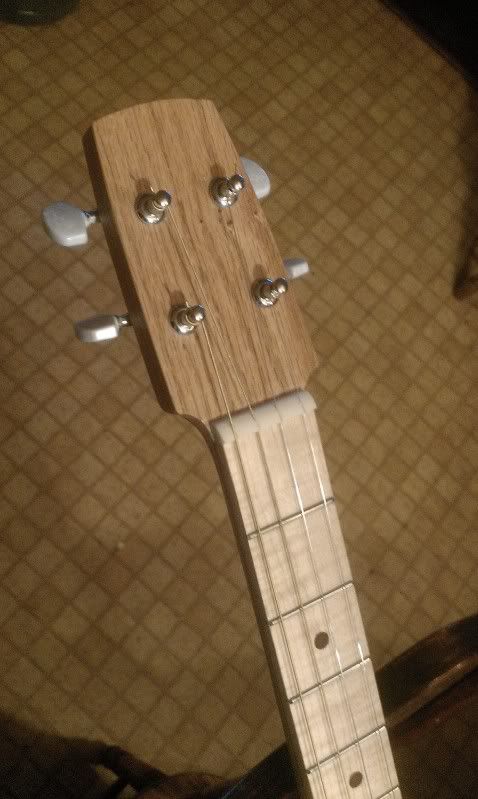
Mike, Thanks for the compliment. I put a fence on the band saw and put the faceplate against the fence and slice the back off down to the widest part of the wings and then let the rasp extend the neck until I meet the saw kerf. I think an easier method that will yield prettier results is to use a Safe-T-Planer and I am thinking that would allow making a neck with the Martin style diamond where the peghead meets the neck.
http://www.stewmac.com/shop/Tools/Planes/Wagner_Safe-T-Planer.html
-
-
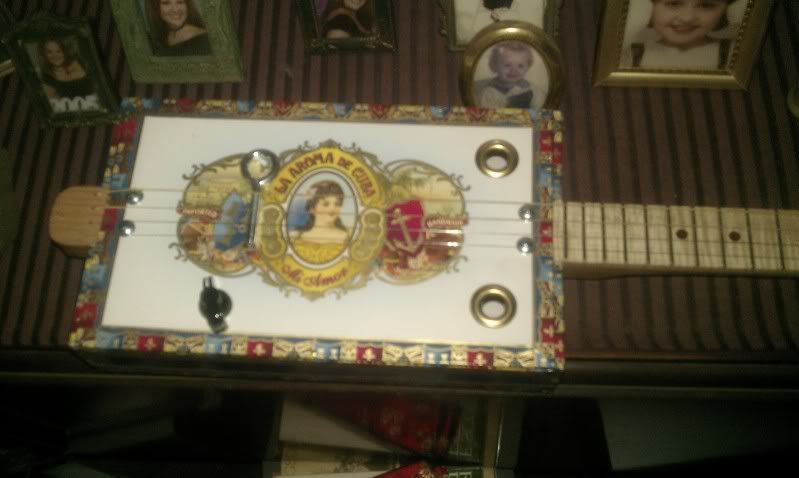
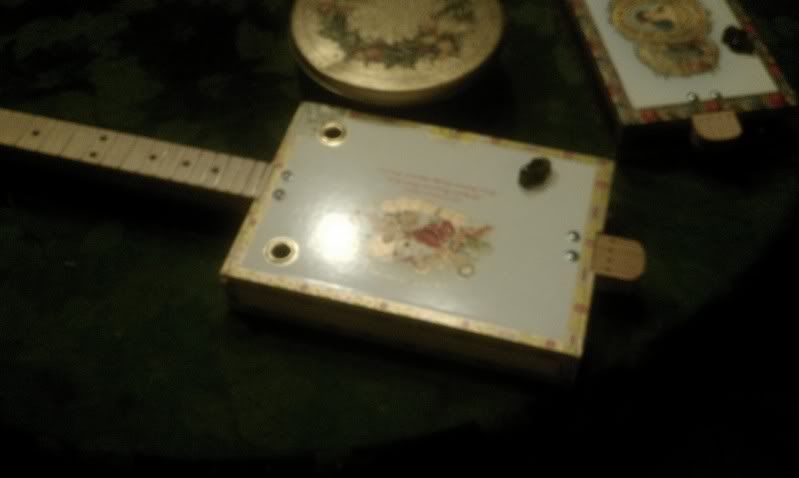
Well, first off, Merry Christmas and happy new year to everyone here. I'm happy to say that I completed 3 guitars in time for giving them as presents for Christmas. It was close, but I got them finished. I have a few observations from these first three that I'll pass along. I used a 13 degree scarf joint and I think the angle is too shallow because there isn't sufficient down angle coming off the nut to suit me. Next build will have a 15 degree scarf. These things sound better acoustically than I would have thought and the things I bought from CB Gitty were perfect, inexpensive and got here fast. This was a very rewarding project and I can't wait to make the 4th. Here are some photos of the finished guitars.
-
-
You can also increase the strings down angle with string trees/retainers.
They can be made to look very elegant. Anything from a metal bracket
going all the way across the headstock and parallel to the nut, a simple
screw, to something professionally purposed to the task (as featured in
the dreaded Stew-Mac catalog).
-
Permalink Reply by blufloyd on
-
Pretty sweet. And your just up the road if I need help. I'll note the 15 deg angle. Need a cabinet grade blade for the power miter saw. Looks like I need a workbench too.
- ‹ Previous
- 1
- 2
- 3
- Next ›
The Essential Pages
Recommended Links & Resources
- CigarBoxGuitar.com - the knowledgebase of the homemade music movement.
- Cigar Box Music - How-to-Build CBGs DVDs, How to Play CBG and more!
- 3-String-Guitar.com - John "Red Dog" McNair's unique take on cigar box guitars and their history - lots of historic photos!
- The Cigar Box Guitar Manifesto - the mission statement and rallying cry for the Cigar Box Guitar Revolution.
Forum
Are metal frets necessary?
Started by J. D. Woods in Performances, How to Play, Lessons, Concerts. Last reply by Southern Ray 6 hours ago. 8 Replies 1 Like
AI Search Query - Curious Answer
Started by Southern Ray in Other stuff - off topic, fun stuff, whatever. Last reply by Southern Ray 6 hours ago. 6 Replies 0 Likes
Song lyrics for Steve's new song
Started by J. D. Woods in Performances, How to Play, Lessons, Concerts. Last reply by BrianQ. yesterday. 4 Replies 0 Likes
UK - Best Place to Buy Cigar Box's
Started by Rich Butters in Building Secrets, Tips, Advice, Discussion. Last reply by Crazed Fandango on Tuesday. 4 Replies 0 Likes
Busking Songs...
Started by Nomad Jack in Performances, How to Play, Lessons, Concerts. Last reply by J. D. Woods Apr 17. 7 Replies 2 Likes
Joseph J. Rogowski about Current Based Pickup Design
Started by Moritz Voegeli in Building Secrets, Tips, Advice, Discussion. Last reply by Southern Ray Apr 14. 6 Replies 2 Likes
crossover guitar.
Started by Timothy Hunter in Other stuff - off topic, fun stuff, whatever. Last reply by Timothy Hunter Apr 10. 14 Replies 3 Likes
Flat bucker under box top. Any Success?
Started by Tom T in Building Secrets, Tips, Advice, Discussion. Last reply by Southern Ray Apr 9. 9 Replies 0 Likes
Has anyone tried this? Thoughts?
Started by Southern Ray in Building Secrets, Tips, Advice, Discussion. Last reply by Southern Ray Apr 4. 7 Replies 1 Like
just came accross this pickup idea on youtube.
Started by Timothy Hunter in Building Secrets, Tips, Advice, Discussion. Last reply by Southern Ray Mar 27. 1 Reply 2 Likes
VIDEO: Building a CBG with limited resources.
Started by Taffy Evans in Building Secrets, Tips, Advice, Discussion. Last reply by Southern Ray Mar 10. 1 Reply 3 Likes
Free PDF Download: Vintage Guitar Effects Plans - 1967 Fuzzbox and 1969 Treble Boost
Started by Cigar Box Nation in Feature Articles. Last reply by BrianQ. Mar 9. 4 Replies 3 Likes
Tune up songs
Started by Ghostbuttons in Building Secrets, Tips, Advice, Discussion. Last reply by Timothy Hunter Mar 9. 5 Replies 1 Like
Duel output jacks
Started by Justin Stanchfield in Building Secrets, Tips, Advice, Discussion. Last reply by Taffy Evans Mar 8. 6 Replies 0 Likes
No Harmonics
Started by Ken I in Building Secrets, Tips, Advice, Discussion. Last reply by Brian partington Mar 8. 8 Replies 0 Likes
Camera suggestions?
Started by Southern Ray in Cool gear discussion - that's not cigar box related. Last reply by Southern Ray Mar 6. 5 Replies 0 Likes
CBG site issues, continued.
Started by Taffy Evans in Other stuff - off topic, fun stuff, whatever. Last reply by Taffy Evans Mar 5. 4 Replies 2 Likes
Anyone used a violin-style tailpiece on a CBG?
Started by Justin Stanchfield in Building Secrets, Tips, Advice, Discussion. Last reply by Carl Floyd Mar 1. 15 Replies 0 Likes
Guitar for the grandson
Started by Joe in Performances, How to Play, Lessons, Concerts. Last reply by Carl Floyd Feb 29. 13 Replies 0 Likes
Building with vintage paper/pressed board cigar boxes.
Started by Chance in Building Secrets, Tips, Advice, Discussion. Last reply by Southern Ray Feb 22. 12 Replies 1 Like
Blog Posts
I'll be fashionable this summer =)
Posted by Vlad on March 31, 2024 at 11:48pm 0 Comments 1 Like
Everyone can make CBG. And I did it =)
Posted by Vlad on March 6, 2024 at 2:32am 5 Comments 2 Likes
.✨. Cover Me ..♪♫•*¨*•. ~ the Delta Blues Outlaws
Posted by billy jones bluez on February 28, 2024 at 2:09pm 0 Comments 0 Likes
Q&A with Arkansas-based talented blues musician Billy Jones, one of the very best authentic modern artists
Posted by billy jones bluez on February 17, 2024 at 11:00pm 0 Comments 0 Likes
Big Power Bank for Small CBG =)
Posted by Vlad on February 11, 2024 at 1:06am 1 Comment 1 Like
Latest Activity
CigarBoxGuitar.com Knowledgebase Articles
Events
-
Republic of Texas CBG Festival (8th Annual)
May 11, 2024 from 11am to 8pm – Speakeasy Grill
0 Comments 0 Likes
-
20th Annual Cigar Box Guitar Festival (Day 1)
May 30, 2024 from 6:30pm to 10pm – The Casual Pint of Huntsville
0 Comments 0 Likes
Music
© 2024 Created by Ben "C. B. Gitty" Baker.
Powered by
![]()