#1 resource for Cigar Box Guitars, Free Plans, How-To, Parts & More!
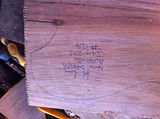
Blackwood resonators, June 2012
Please note: all the little thumbnails can be clicked for a bigger view, i just did it this way so the whole page would load faster, gonna be lots of pics..
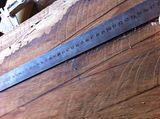
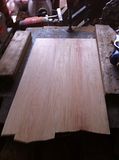
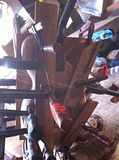
started gearing up for a batch of solid body guitars. the bodies or at least the majority of them will be from this slab of Tassie blackwood
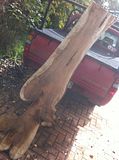
its about 7 feet long, maybe 16 inches or so wide at its narrowest point, and two and a half inches thick. I got two of these for $110 from a guy who mills fallen trees he finds. Because he doesnt chop the trees down Im more than happy to buy the stuff.
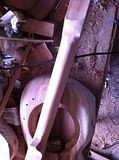
the neck blanks are here
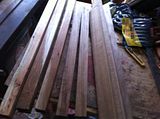
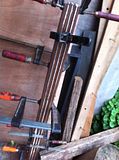
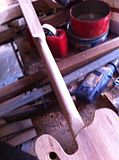
from the left, three Tassie Blackwood and two Queensland walnut one piece jobs, then some nicely flamed tassie oak which ill be laminating up with walnut veneer tomorrow after i get my clamps back from this one
which is recycled merbau decking laminated with tas oak veneer. this is for an extended range 7 stringer, the one piece necks will be four pair jobbies. One of them is for my good buddy Harrison Withers, so hopefully he'll chime in at some point and say 'i want that one'.. making an axe for harri is kinda intimidating incidentally, cos he's got one off just about everybody, theres probably more gitts at his place from members of this community than anywhere else on the planet.
Ill be doing my best to remember to document everything so you can see some of my tricks and mistakes too. Ill also try to stick to a batch mentaility as long as i can, although i generally cant avoid taking one and just running with it at some point. it always happens.
all questions, suggestions, criticisms etc welcome :)


****
Wed June 20
ok been a couple days..
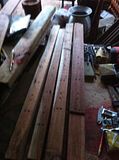
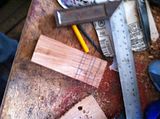
got the laminates out of clamps, ripped each up the middle so now i got two neck blanks from each.
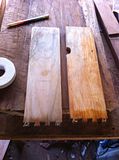
cleaned em up and got fingerboards on the four, a blackwood and a merbau one on the merbau pair and a spotty gum one and some spalty mystery wood one on the tas oak ones. all but the spotty gum one had a contrasting veneer underneath for a kinda fake binding look. unfortunately the spotty gum (a eucalypt btw, very hard wood) cupped a little while in the clamps.. its ok but the join is not super clean, so i guess ill be binding my first fingerboard here.. see, mistakes become features.. (Iearned this from the maestro, Mr Ted Crocker)
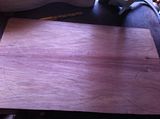
broke the blackwood into four body blanks, I was kinda hoping for five bummer..
put the Qld walnut neck blacks back on the shelf, Ill be doing three one piece Blackwood ones and one of the laminated ones with these four.
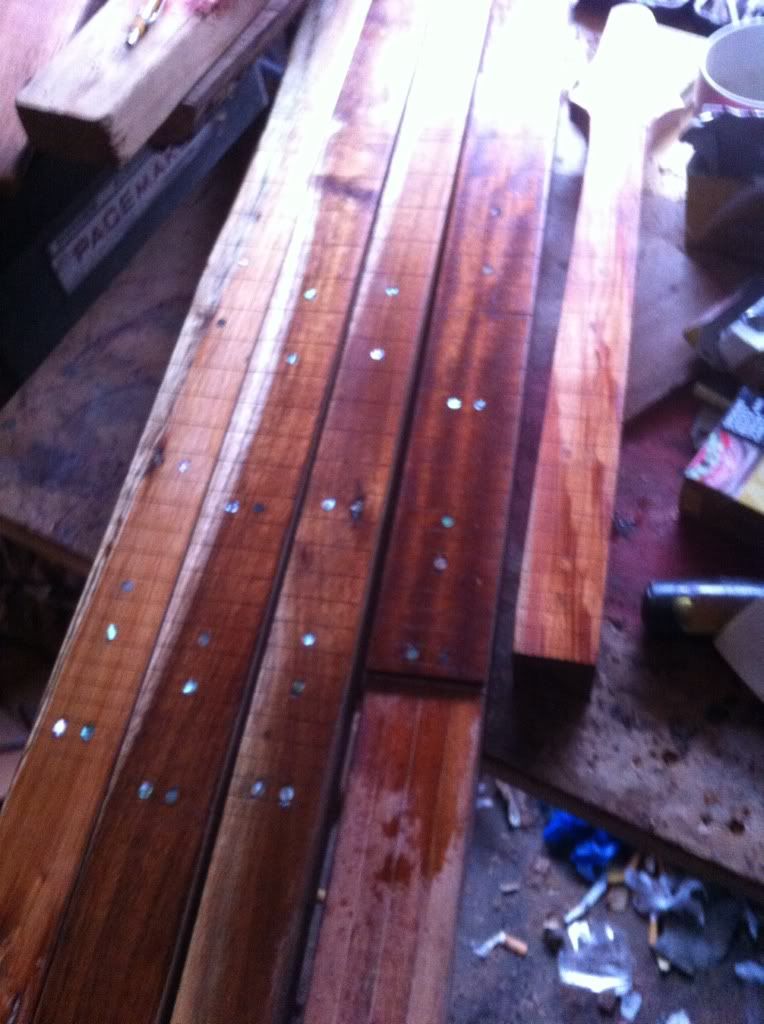
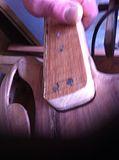
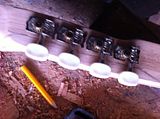
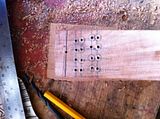
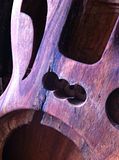
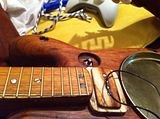
Ok so I got four of em slotted and drilled for dots. Ill be giving my usual cheapskate twig dots a break and doing abalone, these blackwood necks are kinda special, and ones going to Harrison, a guy with many many guitars, so a few 40c dots wont hurt..
left 8cm for a scroll or carving on each of the one piece necks, and 17cm for the tuner slot
thinking Harris neck is the third from left. The real spalty Blackwood one at left is kinda special, it was one of the backgrounds in my iPhone app jefretcalc in its first version.. the other half of that one was on this one from 10/2010 btw autumn moon guitar
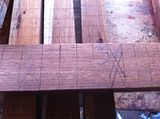
for placing the dots i rule a line from one corner to the other, dead simple..
for the doubled ones i measure in a mark from each edge, 14mm in this case, and make two X's the amount of the inset determines how far apart the dots will be centre to centre. I guess this is pretty obvious, but i thort id put it up, might help someone or other :)
oh, and when ur drilling for dots guys, start em with your drill in reverse, sure it blunts the bit faster, but you get a much cleaner hole with less risk of tearing small chunks out


****
Thurs June 21
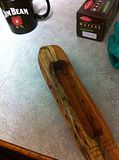
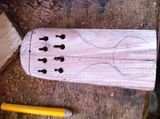
got the abalone dots in, oh my they are nice huh. This is my first time with these. I always thought they would be quite expensive, but if you search ebay for 'abalone inlay' you can find em pretty cheap indeed. These ones are 6mm green abalone. Shown with an earlier bolt in mandola neck with my old stylee twig dots. might hafta drill those back out. rubbed a little tung oil in for this pic, thl they are only quick sanded to 120 grit at this point
 that mandola neck coming off the shelf because one of these body blanks might turn out a little narrow yet
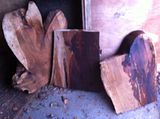
tomorrow we get the router out :)

****
Tues June 25
pretty much had the weekend off, had my daughters birthday etc..
took the widest of the necks that I had slotted and dotted above, the merbau / merbau one, and decided to make it a 6 string cbg.. well an hour here an hour there and thats just about done, but while waiting on glue today i had a little guilty pang about jabes there waiting on help for neck slots, so time to get back to the main event..
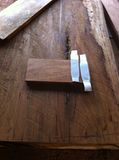
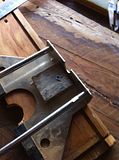
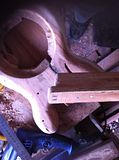
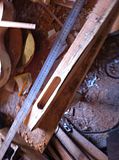
up until this year i had only ever done one size of bolt in neck slot, standard Fender size. thats pretty easy, because you have a jig to follow, basically a rectangle the exact right size, and you can tape or clamp it down and just follow that with the router.. well this year Ive done everything but standard, and every necks a different dimension, so I need a jig with some adjustment. There would definitely be better ways to do this, this is just my quick way of doing it, but it hasnt let me down yet in 8 neck slots so far this year.
we start with two planks, nice and square and of identical thickness. I used the sides of a crusty old drawer I found. we also need one more bit of scrap, nice and square and around 7mm thick, maybe 1/4".. I used a bit of fingerboard trimming..
I put the neck on the plank where i want it and trace around the end with a pencil. the fingerboard scrap piece is double-side taped down on the plank to mark the end of the slot. by pushing down real hard i get the double-side tape to stick quite well. From here on out, where Im using double side tape, please take it as read that ive applied a nice bit of pressure on it, leaning my body weight on it.
the sides of the slot will be marked with the drawer sides, so I prepare the top of the fingerboard scrap with double tape on one side
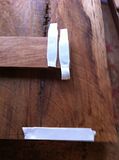
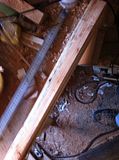
the first drawer side goes down, and I drop a few screws through into the body where it wont matter because the cutaway will remove the holes. make sure that the screws go right in countersunk so you dont impede the router..
the other side of the slot is prepare with the double tape..
I use the neck to help me line up the second drawer side, but theres a trick, you lift the neck and nudge the drawer side in a pinch before you stick it down, so the neck wont actually fit..

its kinda fiddly and takes a couple minutes, but its worth the effort for a nice snug join.
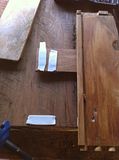
as we can now see, the piece of fingerboard scrap creates an angle which the router will ride, and cut into the bottom of the slot. Ive gone for a bit of an angle here because these will be resos with coverplates, but i always do a lot anyway so there you go its just an excuse ;)
..
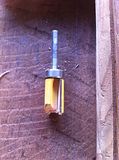
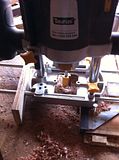
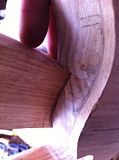
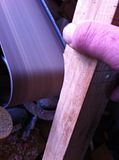
this is the router bit i used, just about my favourite bit. it has a big bearing above the cutter, perfect for following a template from above..
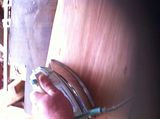
when you're routing like this you have to be careful not to cut into your guides. the bearing needs to run up to the drawer sides and fingerboard scrap but the carbide edges mustn't touch them. so you need to go in to the right depth before you clean up the sides. Take it easy with the router, if you only take a few mm with each bite you'll get a nice clean cut. ALWAYS GO CLOCKWISE. and ALWAYS ALWAYS ALWAYS KEEP BOTH HANDS ON THE ROUTER. clamp your work down, never ever ever have one hand on the work and one on the router. ok lecture over, sorry.. I dont wanna encourage anybody to lose a finger or two..
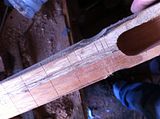
once i have the depth about right I set up for one of my secret (well, used to be :D ) weapons, routing in an extra 2mm at the back end only. I'll drop a small scrap of sheet steel in here when I bolt the neck in, I believe it helps keep the screws perpendicular to each other, so the neck cant twist at all (which it shouldn't anyway, as we have such a snug fitting slot so far)
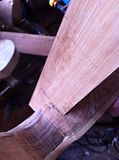
pulled the jig off, and its a real snug fit. Because im doing a few at once i pair the neck and body by marking with a number.
....ok so I did two like this, one for me and one for harri.
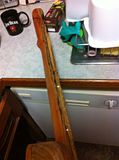
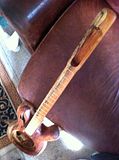
it took a fair bit of effort, but I managed to push the neck into its slot in my one for a pic, illustrates the neck angle.
Harrisons one is an even tighter fit, no way its going in without a few shavings from the chisel, but i'll leave it until the neck is finished and sanded etc.
****
next.. designing some bodies :)..


******
Wednesday June 27
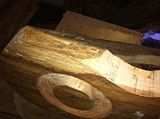
using a straight edge i extend the lines from the neck's edges onto the body's face, marking the outer path of the strings,
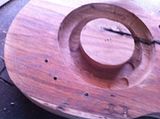
then mark in the approximate bridge location. the center of the bridge is the center of the tone well, so I knocked up a little circle cutting jig and anchored it there.
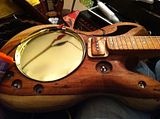
a scrap of ply drilled for the trammels keeps things square while i cut some donuts
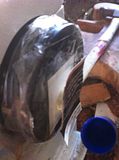
got such a nice fit for the cookie tin lid 'cone' that when i test fitted it i really struggled to get it out again

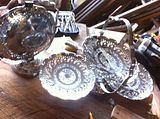
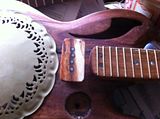
the coverplates for these come from one of these, if you want a three pack search ebay for 'cake stand chrome folding' most of them are in the UK dont go past $20, they come up all the time
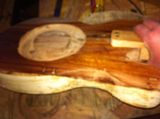
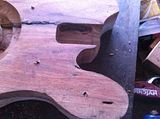
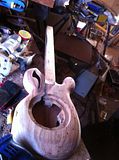
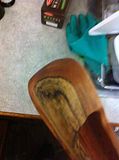
ok with the tone well cut into a decent depth, about an inch, I can start roughing out a shape

after a few minutes fine tuning it i roughed out on the bandsaw,

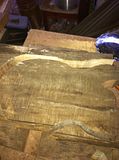
got a bit of bug eaten barky edge up top, think I like it..
tomorrow, catching up with Harris...
******


*******
Thurs June 28
******
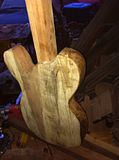
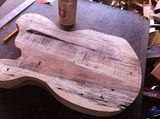
well I said I'd catch Harri's one up, so got the tonewell dug out and started on cutting out a rough shape..
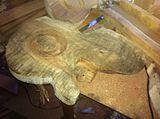 t
tmade a start on the shape but im unsure how im going to do the enlarged upper cutaway.. plan is for an array of sympathy strings, a zither with tuners up here..
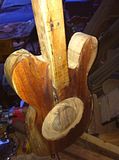
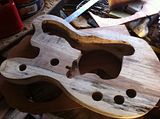
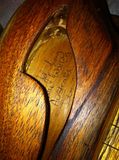
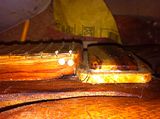
gave that a break and got some planing / sanding done on my one, rubbed a little tung oil in for this pic although again its only rough sanded, and a lot of it with the disc sander, so its all those curved lines on it..

the worm eaten edges are particularly cool, and im very pleased how well the spalty neck matches it..
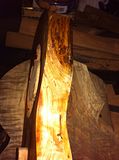
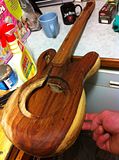
i always think its a good test for your bolt in neck slots if you can hold the body up by the neck, with no glue or screws, just the tight fit there
tomorrow, more body beating
*****


*******
Fri June 29
******
Had a bit of a health scare with my son which kept me from building for a couple weeks. He's ok now
*****
*******
Thurs July 12
******
I have to hollow these bodies out some so I edge joined some cedar panels for a back
*****

*******
Fri July 13
******
Pulled the cedar back out, planed it smooth
Ironed on some blackwood veneer
Then repeated on the other side
This veneer is already bookmatched on the roll, nice..
Carefully lined up the center line on the back of the body and traced around it onto the back
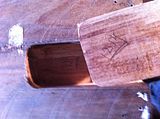
Then situated and scrolled out my control covers

Lined the back up on the rear side of the body again (where it will eventually be glued) and traced the inside of the control cavities onto the body blank. I need to leave wood here for the covers to stand on / screw into. Drilled out pilot holes for the controls
Set the back and covers aside and started routing the chambers around where the control cavities will be.. (I will be able to route those in after the back is glued on)
*****
***

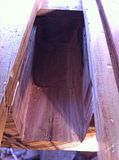
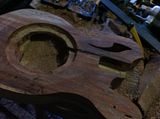
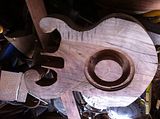
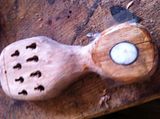
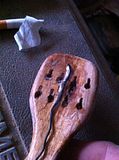
Then flipped it over and made the chamber (avoiding the control cavities) also drilled out for the pots and switches with a forstner bit, although the depth is not final because there will be a fair bit of carving from the top still. You can see that eventually I cut right through into the conewell that we made earlier from the top, this is important to join these cavities to create a larger volume of air to sing.
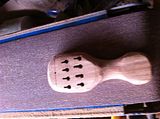
With the cavity within only 6mm or so of the top I drilled a wee hole for putting the scrolly blade thru and knocked out a sound hole. The pencil lines are the markings for the initial carving from the top
Made a good start on that..

Then prepared the back by signing so it'll be visible through the soundhole..
Before planing the back of the body perfectly flat and gluing it on
*****


*******
Sat July 14
******
Out of the clamps, trimmed the back down using the bandsaw and sanders, wary that a flush trimming with the router might tear out bits of the veneer.
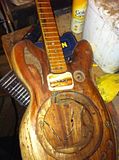
Carving the top
Sanding sanding sanding the top
I had planned to make some palm pedal type benders for these two but I'm abandoning the idea to try on a simpler steel first because the octave pairs complicate things. Instead I'll do a violin / archtop guitar type floating tailpiece, so I went ahead and carved that area behind the bridge down too
*****

*******
Thurs July 20
******
Been making little refinements to the body for the other one, it's a little dr Seuss because of the wood I need for the zither tuners up there. Hopefully with a lot of hollowing out and carving it'll become something guitarish. YOu may have noticed that I flipped this blank over right at the start for the neck slot compared to the other, so this will feature the white sapwood much more than the other on the face, which is predominantly the chocolate heartwood. Unfortunately a lot of that checking is quite deep and will not sand out completely, although some will. It'll still be real nice Harrison don't stress. This happens from the wood shifting as it dries, this is quite a knotty piece with a couple branches coming off the tree right here.

*****


*******
Fri July 21
******
With the body shape on the first one pretty much finalized we can finally return our attention to the neck. I needed the neck started to make the slot, but the taper and profile is better left til now so that it meets the body perfectly and is still square at the portion which sits inside the slot in the body.
Putting the neck in the slot I mark it where it sits above the body and cut a small notch from the end, so it'll sit deeper in the slot than before. This shifts the bridge backward but I had already allowed 2cm for this when I calculated the center of the tone wells right at the start. Its not an essential step, but I think it makes for a nicer gitt
The notch is made with the bandsaw, then I round over at the new ends with the sander
Ok. So with that done the neck can be pushed into its final position. I do that and pencil around the join (onto the neck) on both sides and the bottom, the taper and profiling cannot go beyond these lines or they'll sloppy up the neck to body join. On the other hand I want as little heel and as neat a taper as possible, so they want to come right up to these lines but not beyond.
Before I taper or profile I route the tuner slot. While the sides are square the rouer can easily follow the sides.. By tuning the router around without moving the edge guide I can get the slot equidistant from each edge. I have done many of these violin style heads.. Usually I taper this route, so it's narrower at the end than at its start, and then follow the taper with the outsides of the head. Although it looks great and more like a violin head it's not really suited to geared guitar tuners.. Because they will push their string posts in at 90 degrees the top and bottom tuners wind up at weird angles to each other which can lead to tuning instabilities especially if you did any kind of whammy bar or benders. Anyway in this neck I elected to sacrifice the style for function and keep it all square, more like a typical dulcimer head.
When carving three dimensional objects I find it helpful to push one of those dimensions aside and only work with two at a time. I elected to do the profiling first because that provides the most usable bit of scrap for pickup bobbins, tailpieces and bridges etc.
Ok so pencilled the profile in for the neck and for the head, leaving a nice volute in between.
After bandsawing them out the disc sander cleans it up for a straight line in seconds, and the end of the belt sander cleans out the curves
Onto the taper. Ok I gotta say it. I know most guys on this site do not taper their necks. I would never make a negative comment on your pics. But for myself I gotta say.. Untapered necks are UGLY! There it is. I don't doubt a half dozen of you will come up and tell me how great your axes are and how unnecessary you think it is. I don't give a shit, I love your work, but untapered necks are amateur and shit as far as I'm concerned and personally I'll taper every neck, even a diddly bow.. (I did do four untapered square necks in the early part of 2010 if you look in my pics)
And the truth is guys, it don't take much at all. On this neck I'm taking 3mm from each side at the nut.
Ok ha end rant.
I take out that 3mm from each side first with the end of the belt sander, just as in the pic above. I love the end of the belt there, one of my fav tools. (incidentally, I keep very coarse paper on the disc sander, 60grit, but finer 100grit on the belt. The disc is my 'fast removal of material' machine.
Once those notches are out the disc sander makes the tapers to the line in seconds.

It may look uneven here because if you look closely you can see a wee bit of bark at the left hand edge of the head right where it widens past the nut. Tis is intentional, and matches the Barry side on the same edge as the body ;) (it'll all make sense at the end)
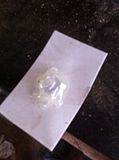
Once the taper is in I can put in the side dots, 4mm green abalone, again from eBay. Simple really, run the drill in reverse as before. Where you have two in close proximity, at fret 12 and particularly at 24 if you go that far its sensible to do the pair one at a time, otherwise you can easily tear out the small amount of material in between the two holes with the drill. I used cheap dollar store epoxy for the abalone.
with the dots sanded flat (2 coffees, one for most of the dots to set and a second for the second dots at fret 12 & 24) and the taper and the profile done I can bring the two together by rounding over. I often carve this with a spokeshave but I'll also often just do what I did this time, rolling it over on the disc sander and using the end of the belt as before to smooth out the ends. In this pic only one side of the heel has been to the belt so far, so you can see where the disc can't get to
Test fit, you can see how there's virtually no heel
onto the head, drilled out for tuners, dry fitted them and marked out where I need to carve away so they can turn a full revolution. (the other way of looking at it, marked out where the head must remain square for the tuners to mount flat, so I can carve away the rest)
Got that rounded over and started to think about the scroll..
Well I thought about it a little and decided I didn't want an elaborate carving on this head. I really like the way the spaltiness starts up here, and I wanted to focus on the natural beauty of the wood. So I just rounded it off.
Sanded for around an hour with 60grit then a few minutes with 120..
And that's where we are now.
(rubbed in quite a bit of vegetable oil for these pics)
Really pleased with this..
Tomorrow, frets, then some pickups. I have a little of mr gittys gold fretwire and I'm very tempted to try it out tomorrow, I'll probably never have such a nice one piece neck again..
*****


*******
Mon July 24
******
ok went with the gold frets. They seem a little softer than the nickel, time will tell how they wear. Sure are nice tho.. Dianne warned me once that they're addictive.. Thanks love, I can see why :)
*****

*******
Wed July 26
******
Tailpiece.. Decided to go with a nice carved violin / jazz box type tail. There will be no end pin, so it'll be lashed down to the body with a loop of leather or rawhide thru into the soundwell.. (that'll make sense when you see it, don't think I've ever seen this before)
Making it from scrap from the neck so it'll follow on thru.
A single fret slot, and a bunch of holes..
Rearward holes enlarged to fit ball ends, joined to forward ones with scrollsaw/dremel
Bit of rounding over..
Inlayed a little seashell at the end there

The hole in the fret slot is for the earthing cable, stripped a good inch or so at the end and fed it in from below. (guess I forgot to document hollowing out the underside here oops)
Wonder where the other half of the cigarette went?.
bashed the fret in after the wire, the multimeter shows me a good circuit thru the fret :) cleaned and sanded, applied my usual 'poor mans lacquer' ;)

*****


*******
Fri July 28
******
Pickups..
Need a nice fat single coil for the neck position and another for the inside. The interior one will not be visible and does not need more than one pole piece. Although I only need one, I'll be needing two for the other guitar so I'm doing three of these today.
The bobbins for these are made from a cigarette packet. I'll often make pickups from scrap cardboard if they're to be hidden, it's much easier to work with cos it's flexible. I recommend it to anyone wanting to get started winding pickups, they can easily be covered in veneer, wrapped in cookie tin bits or stuffed in a mints tin etc etc..
Gluing them up on the steel table of my bandsaw.
Used hot glue cos it's so cheap. It doesn't stick to the super smooth coating on the rare earth magnets very well at all, but it sticks on the cardboard, so I basically surround the magnet with glue and stick the top on before the glue cools.
Once the top is on you can use the hot tip of the glue gun to smooth out the bobbin interior, this also opens out the cardboard a little to make for easier winding
Taped onto my winder (the flywheel on the side of a sewing machine)
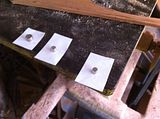
These ones got 2k winds apiece except for the last one which got 1793 before I ran out of wire
The neck pup bobbin is from a nice two colour bit of body scrap (lots of that on the shop floor, gave a bunch to my neighbour who turns pens too)
Five terminals cos I'm winding a tapped coil for the main pickup and a separate coil for the sustainer driver ;)
Pole pieces are just nails
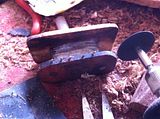
with the bobbin made to my satisfaction I can cut a slot for it in the body. Forstnered it out first
Yep that'll work
wound 2500 turns before the tap (rhythm sound) then another 1000 (lead sound) then terminated that coil and wound another 2000 separate for the sustainer driver, this will feed an amplifier in the guitar, it's not for the output jack
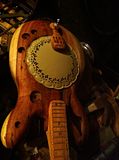
Also painter the coverplate tan with some metal primer paint that I found in the shed, just happened to be there, I think the colour works well.
Recessed the controls, you can now see why I didn't go too deep with the cavities before. This will enable the knobs to sit nice and flush on the carved top
Oh found some really nice gold tuners with chocolate buttons on eBay.. Had to buy two sets of course.. Introduces a delay when I was almost there, but i think it'll be worth it
*****


*******
Mon July 30
******
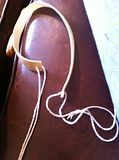
The amplifier circuit for the sustainer comes from this Hannah Montana headphone amp
busted it open, soldered in cables to access the input,output and power from away from the circuit board. Also clipped of the power led and extended that with cable too, so it can be situated to light up thru the coverplate when on. Bonus, the amp has a 'distortion' switch, managed to solder in hookup wire to each side of that switch, when I join em the distortion is turned on (so I can put a switch n the gitts surface, I didn't drill for it, but it can go on the coverplate or I do have some push pull pots too, was already planning to use one for the amps power)
Made a little riser for the pickup from the same bit of scrap, the chocolate had run out, but managed to mirror the spalt lines. This riser means I need to take another little notch from the neck.
Fits together like Lego :)
while I had the little drum sander on the dremel, one of the last touches on the neck, carving away for the nut into the tuning slot so the outer strings don't foul on the wood.

*****


*******
Wed Aug 2
******
Drew up my circuit (as it will appear from behind, ie thru the control covers when soldering..) on some little sketch app on the iPad..
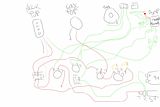
Got all the passive stuff done, master volume and blender and tone control for the rhythm sound and switch. I use a balance pot for the tone control as well, by using the pot as a variable path to bypass an r/c type filter I can use both sides of the taper, getting two tone controls in one! Take a look at the schematic above and ask for more details if you don't get it but yeah, basically two tone controls from one knob (you can only use one or the other, the left one only comes into play after the right one is at 'ten' and vicki verco..)
I'm particularly pleased about the rebated switch there, those can be kinda easy to flip accidentally)
*****


*******
Sun Aug 5
******
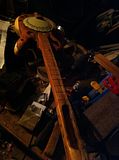
Have a goat hide and half a kangaroo hide from my banjo trip a couple years back.
This ones goat
Cut a strip off that, maybe 3/4 inch or something and gave it a soak for a couple hours
had to thread some twine thru each end to get it into the holes I drilled in the body for it, quite a tight squeeze
looped it under the tailpiece once and into the body, introducing plenty of twist as I went. I didn't cut the hide quite long enough to tie a knot I could have confidence in, so I cheated and swabbed on a blob of 5 minute epoxy over the knot.. (mistake #3 or is it #4??? :D )
Anyway, tailpiece looks good, I'm pretty happy with the rawhide idea, looking at it now (next evening) its drying and tightening up nicely
*****


*******
mon Aug 6
******
Not a lot of time before dark tonight, big and difficult day at work..
Just turned a few knobs.
I've tried wooden knobs from scrap a lot, and I find they work loose o er time and fall off. Sometime ago I tried them with sticks, drilling into the center of the growth rings, and I find the radial nature of the grain (as opposed to the linear grain I'd have from a bit of bandsaw scrap) really helps the knobs get a good grip on the pot which actually gets tighter not looser over time ;) they also take stains in a really interesting way, particularly if there was a branch or two coming off right there (knots) which are the bits I like to target from my knobs..

*****

*******
Tues Aug 7
******

*****

Replies to This Discussion
-
Permalink Reply by Randy S. Bretz on
-
wow Jef thats some real pretty wood you got there...yeah guess i`d best get started on my first solid body build myself. I`ll take a look in my slab pile for something nice...i`ll be hittin you up for added info as the build progresses..
-
-
Permalink Reply by jabes on
-
thanks Jef ,i see now why you route the body blank to the neck first . If you mess up at least you haven't done all that work on the body first,and also the grain of the wood can in some ways design the body shape i guess.
Well anyway ,yesterday i chopped out the slot with a couple of chisels and got a nice tight fit with the neck and angle, it 's looking pretty good so far, although a bit predictable as far as the body shape. Now to cut the headstock shape,this is the first time i ever added 'ears' .
when i've finished i'll post a pic or two . thanks, i'll try you're method next time ,who knows this one may not work out...;)
-
-
-
there, just need to decide scale ,colours, tuners(I have a choice ) and order the toggle switch . any ideas on pot and cap values would be of help ...I think it's going well although a bit 'ordinary' ...
-
-
Permalink Reply by The Phrygian Kid on
-
naw mate, looking good !!
yeah as I proceed, the order I do things in will make sense, but there really are no rules.. (I would have my scale length sorted before i cut anything at all for example..)
whats the plan here? 3, 4 strings?
we'll see my little jig for testing filters (cap, resistor values etc) towards the end. It really depends on the pickup..
-
-
-
Wow nearly 300 views!
I've been really slack with this blog, sorry guys, it got tedious.
There has been plenty progress the first one is strung up just needs intonating, updates soon sorry :) -
-
-
Forgot all about it!!!
Ha sorry dude strung the sucker up months ago
Ill be getting into Harrison's one soon maybe then.. -
The Essential Pages
Recommended Links & Resources
- CigarBoxGuitar.com - the knowledgebase of the homemade music movement.
- Cigar Box Music - How-to-Build CBGs DVDs, How to Play CBG and more!
- 3-String-Guitar.com - John "Red Dog" McNair's unique take on cigar box guitars and their history - lots of historic photos!
- The Cigar Box Guitar Manifesto - the mission statement and rallying cry for the Cigar Box Guitar Revolution.
Discussion Forum
Hand Tools Only?
Started by T-Gripped. Last reply by ILL GREEN Mar 2, 2019. 5 Replies 0 Likes
Converting a 6 string solid body to 3 string solid body?
Started by Tex Pierce. Last reply by Tex Pierce Sep 30, 2017. 6 Replies 0 Likes
My 2nd first solid body guitar
Started by Nick Johnson. Last reply by Paul Craig May 28, 2016. 1 Reply 2 Likes
Richey Kay #49
Started by Richey Kay. Last reply by gary sheldon May 8, 2016. 7 Replies 2 Likes
Richey Kay #31 - my first solid body
Started by Richey Kay. Last reply by Richey Kay Jan 26, 2016. 5 Replies 8 Likes
Kensi, my Dark Fae Spellcaster
Started by Kel Wilson. Last reply by Matt McCarthy Dec 12, 2015. 6 Replies 1 Like
electrify a solid body
Started by vinny brig. Last reply by Ricky Johnson Nov 10, 2015. 5 Replies 0 Likes
23 inch solid body Tenor Guitar #165
Started by G.S. Monroe. Last reply by The Phrygian Kid Nov 5, 2015. 3 Replies 2 Likes
Help
Started by Leadfoot T. Last reply by 0xp0lyyfdwzrt Nov 4, 2015. 4 Replies 0 Likes
The Blacksnake
Started by Randy S. Bretz. Last reply by Randy S. Bretz Nov 25, 2014. 2 Replies 2 Likes
Blackwood resonators, June 2012
Started by The Phrygian Kid. Last reply by The Phrygian Kid Jan 13, 2013. 7 Replies 0 Likes
Are you ready for a Football Soild body CBG?
Started by Bob Lumpkin. Last reply by The Phrygian Kid Aug 18, 2012. 3 Replies 0 Likes
Cases
Started by Steve Terry. Last reply by Bob Lumpkin Aug 18, 2012. 2 Replies 0 Likes
fitting the neck to the body
Started by jabes. Last reply by The Phrygian Kid Jul 11, 2012. 3 Replies 0 Likes
Tailpieces
Started by Randy S. Bretz. Last reply by Wichita Sam May 17, 2012. 3 Replies 0 Likes
Blog Posts
I'll be fashionable this summer =)
Posted by Vlad on March 31, 2024 at 11:48pm 0 Comments 1 Like
Everyone can make CBG. And I did it =)
Posted by Vlad on March 6, 2024 at 2:32am 5 Comments 2 Likes
.✨. Cover Me ..♪♫•*¨*•. ~ the Delta Blues Outlaws
Posted by billy jones bluez on February 28, 2024 at 2:09pm 0 Comments 0 Likes
Q&A with Arkansas-based talented blues musician Billy Jones, one of the very best authentic modern artists
Posted by billy jones bluez on February 17, 2024 at 11:00pm 0 Comments 0 Likes
Big Power Bank for Small CBG =)
Posted by Vlad on February 11, 2024 at 1:06am 1 Comment 1 Like
Latest Activity
I Can Only Imagine: 2-String Chugger License Plate Cigar Box Guitar
Current Instrument Line-Up
AGP #530 - ''Pink Floyd''
Jose Cuervo | Shelly West cover on 4-string CBG
There i was Standing at the ..... BCB - A. D. Eker 2024
Current Instrument Line-Up
Frethound 4 String
CigarBoxGuitar.com Knowledgebase Articles
Events
-
Republic of Texas CBG Festival (8th Annual)
May 11, 2024 from 11am to 8pm – Speakeasy Grill
0 Comments 0 Likes
-
20th Annual Cigar Box Guitar Festival (Day 1)
May 30, 2024 from 6:30pm to 10pm – The Casual Pint of Huntsville
0 Comments 0 Likes
Music
© 2024 Created by Ben "C. B. Gitty" Baker.
Powered by
![]()